mirror of
https://github.com/supabase/supabase.git
synced 2026-07-25 00:42:58 -04:00
 Nik Richers
d46cc88f09
Nik Richers
d46cc88f09
## I have read the [CONTRIBUTING.md](https://github.com/supabase/supabase/blob/master/CONTRIBUTING.md) file. YES ## What kind of change does this PR introduce? Docs enhancement: Agent-ready prompt blocks on all 18 framework quickstart pages. ## What is the current behavior? Framework quickstarts do not surface a copyable AI prompt. Readers have to assemble context themselves when asking an AI coding assistant to follow the guide. ## What is the new behavior? - Partials at `apps/docs/content/_partials/ai/quickstart_prompt_{framework}.mdx` contain `<AiPrompt prompt={...} />` (Prettier multiline single-quoted JS string with `\n` escapes). - Each quickstart includes `<$Partial path="ai/quickstart_prompt_{framework}.mdx" />`. - Runtime: `AiPrompt` → `PromptPanel` (Copy AI Prompt, expandable). - Markdown export: `apps/docs/internals/markdown-schema/AiPrompt.ts` decodes Prettier single-quoted prompt expressions so exported markdown includes an **AI Prompt** section without quote leak. - Shared `$Partial` helpers live in `lib/partials.utils.ts`. - Closes DOCS-1144. ### Example before/after | | Production | Preview | | --- | --- | --- | | Next.js quickstart | [production](https://supabase.com/docs/guides/getting-started/quickstarts/nextjs) | [preview](https://docs-git-nikrichers-docs-1144-add-ai-prompt-blo-5af4d8-supabase.vercel.app/docs/guides/getting-started/quickstarts/nextjs) | **Light** | Before | After | | --- | --- | |  |  | **Dark** | Before | After | | --- | --- | |  | 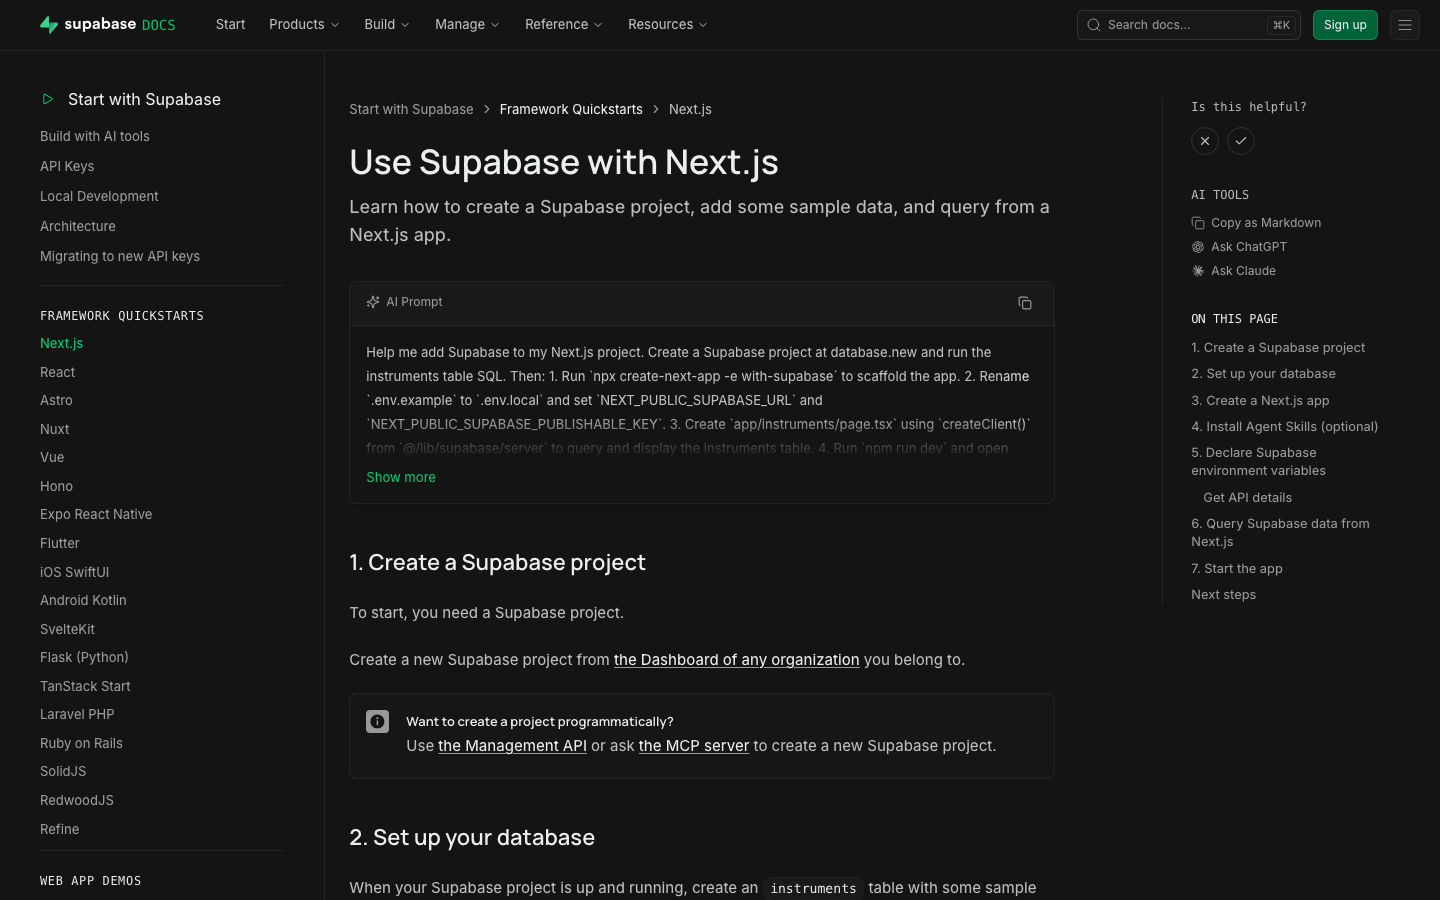 | ### Test plan - [x] Preview renders AI Prompt panel with copy - [x] Spot-check Next.js, Flutter, Expo, Vue - [x] `test-quickstart-prompts` structural - [x] Markdown export includes **AI Prompt** without quote leak - [x] Format CI green after prettier/single-quote decode fix ## Additional context - Worktree: `~/GitHub/supabase/supabase-worktrees/nikrichers/docs-1144-add-ai-prompt-blocks-to-all-18-framework-quickstarts` - Skills: `generate-quickstart-prompts` / `test-quickstart-prompts`; librarian update https://github.com/supabase/docs-agent-skills/pull/21 - `PromptPanel` replaced the older GlassPanel experiment for the expandable copy UI --------- Co-authored-by: Nik Richers <nik@validmind.ai> Co-authored-by: jeremenichelli <jeremenichelli@users.noreply.github.com>



145 lines
4.2 KiB
Plaintext
145 lines
4.2 KiB
Plaintext
---
|
|
title: 'Use Supabase with Expo React Native'
|
|
subtitle: 'Learn how to create a Supabase project, add some sample data to your database, and query the data from an Expo app.'
|
|
breadcrumb: 'Framework Quickstarts'
|
|
---
|
|
|
|
<AiPrompt id="expo-react-native" />
|
|
|
|
<$Partial path="quickstart_db_setup.mdx" />
|
|
|
|
## 3. Create an Expo app
|
|
|
|
Create a minimal Expo app using the `create-expo-app` command with the blank TypeScript template.
|
|
|
|
```bash
|
|
npx create-expo-app my-app --template blank-typescript
|
|
```
|
|
|
|
## 4. Install Agent Skills (optional)
|
|
|
|
Supabase's [Agent Skills](/docs/guides/ai-tools/ai-skills) is a curated set of instructions that give your AI agent procedural knowledge about working with Supabase.
|
|
|
|
To install, run the following command in the root of your project:
|
|
|
|
```bash
|
|
npx skills add supabase/agent-skills
|
|
```
|
|
|
|
## 5. Install the Supabase client library
|
|
|
|
The fastest way to get started is to use the `@supabase/supabase-js` client library which provides a convenient interface for working with Supabase from a React Native app.
|
|
|
|
Navigate to the Expo app and install `supabase-js` along with the required dependencies for session storage and URL handling.
|
|
|
|
```bash
|
|
cd my-app && npx expo install @supabase/supabase-js react-native-url-polyfill expo-sqlite
|
|
```
|
|
|
|
## 6. Declare Supabase environment variables
|
|
|
|
Create a `.env` file in the root of your project and populate it with your Supabase connection variables that you can get from the helper below, or [from the project **Connect** panel](/dashboard/project/_?showConnect=true).
|
|
|
|
<Button variant="primary" asChild>
|
|
<a href="/dashboard/project/_?showConnect=true">Open Connect panel</a>
|
|
</Button>
|
|
|
|
Expo requires environment variables to be prefixed with `EXPO_PUBLIC_` to be accessible in your app code.
|
|
|
|
```text name=.env
|
|
EXPO_PUBLIC_SUPABASE_URL=<SUBSTITUTE_SUPABASE_URL>
|
|
EXPO_PUBLIC_SUPABASE_PUBLISHABLE_KEY=<SUBSTITUTE_SUPABASE_PUBLISHABLE_KEY>
|
|
```
|
|
|
|
<$Partial path="api_settings.mdx" variables={{ "framework": "", "tab": "" }} />
|
|
|
|
## 7. Initialize the Supabase client
|
|
|
|
Create a helper file at `lib/supabase.ts` to initialize the Supabase client using the environment variables.
|
|
|
|
The code below uses Expo's localStorage polyfill to persist authentication sessions.
|
|
|
|
```ts name=lib/supabase.ts
|
|
import 'react-native-url-polyfill/auto'
|
|
|
|
import { createClient } from '@supabase/supabase-js'
|
|
|
|
import 'expo-sqlite/localStorage/install'
|
|
|
|
const supabaseUrl = process.env.EXPO_PUBLIC_SUPABASE_URL
|
|
const supabasePublishableKey = process.env.EXPO_PUBLIC_SUPABASE_PUBLISHABLE_KEY
|
|
|
|
export const supabase = createClient(supabaseUrl, supabasePublishableKey, {
|
|
auth: {
|
|
storage: localStorage,
|
|
autoRefreshToken: true,
|
|
persistSession: true,
|
|
detectSessionInUrl: false,
|
|
},
|
|
})
|
|
```
|
|
|
|
## 8. Query data from the app
|
|
|
|
Replace the contents of `App.tsx` with the following code to fetch and display the instruments from your database.
|
|
|
|
Use `useEffect` to fetch the data when the component mounts and display the query result using React Native components.
|
|
|
|
```tsx name=App.tsx
|
|
import { useEffect, useState } from 'react'
|
|
import { FlatList, StyleSheet, Text, View } from 'react-native'
|
|
|
|
import { supabase } from './lib/supabase'
|
|
|
|
export default function App() {
|
|
const [instruments, setInstruments] = useState([])
|
|
|
|
useEffect(() => {
|
|
getInstruments()
|
|
}, [])
|
|
|
|
async function getInstruments() {
|
|
const { data } = await supabase.from('instruments').select()
|
|
setInstruments(data)
|
|
}
|
|
|
|
return (
|
|
<View style={styles.container}>
|
|
<FlatList
|
|
data={instruments}
|
|
keyExtractor={(item) => item.id.toString()}
|
|
renderItem={({ item }) => <Text style={styles.item}>{item.name}</Text>}
|
|
/>
|
|
</View>
|
|
)
|
|
}
|
|
|
|
const styles = StyleSheet.create({
|
|
container: {
|
|
flex: 1,
|
|
backgroundColor: '#fff',
|
|
paddingTop: 50,
|
|
paddingHorizontal: 16,
|
|
},
|
|
item: {
|
|
padding: 16,
|
|
borderBottomWidth: 1,
|
|
borderBottomColor: '#ccc',
|
|
},
|
|
})
|
|
```
|
|
|
|
## 9. Start the app
|
|
|
|
Run the development server and scan the QR code with the Expo Go app on your phone, or press `i` for iOS simulator or `a` for Android emulator.
|
|
|
|
```bash
|
|
npx expo start
|
|
```
|
|
|
|
## Next steps
|
|
|
|
- Set up [Auth](/docs/guides/auth) for your app
|
|
- [Insert more data](/docs/guides/database/import-data) into your database
|
|
- Upload and serve static files using [Storage](/docs/guides/storage)
|